The Reolink camera system is one of the most versatile and affordable home security systems on the market. With a single plug-and-play system, you can mix and match PoE cameras and wireless cameras.
Reolink’s NVR is also well-designed and easy to use, plus there are several options to add more storage space. On top of everything else, Reolink’s software offers a simple interface along with great free apps for Windows, Mac, iOS, and Android.
I have spent the past month extensively testing the Reolink RLK8-800B4 4K PoE security camera system (check the latest prices). In this review, I’ll cover all the things that make it perfect for both experienced users and security camera novices. I’ll also discuss the system’s shortcomings, as well as alternative options you should consider.
Pros
- Very inexpensive compared to rivals
- No monthly fee
- Simple setup and easy-to-use apps
- Clear 4K video
- Flexible system with many customization options
- Easy to expand with PoE or wireless cameras
Cons
- Nighttime video clarity is average
- Very limited smart home integration
Reolink vs. Arlo
Before I get to the meat of this Reolink camera system review, I want to cover a big question that I see asked all the time: How does Reolink compare to Arlo?
I am uniquely positioned to answer this question because I have been an Arlo user for many years. I have thoroughly tested Arlo wireless camera models ranging from entry-level cameras to the flagship Arlo Pro 4.
While I do continue to use Arlo cameras inside my home, I decided to get rid of all the Arlo cameras outside my house. Instead, I have replaced them with Reolink cameras from the Reolink RLK8-800B4 4K PoE security camera system.
Indoors with limited use, Arlo wireless cameras are great. But outdoors in hard-to-reach spots, Arlo can be a huge pain.
I had several different models spread around the outside home, including Arlo Pro 4, Arlo Pro 2, and Arlo Essential Spotlight cameras.
At best, I found that battery life lasts between 1.5 and 2 months. For hard-to-reach spots, that meant hauling a ladder around my house every couple of months to recharge them. Due to tree cover, solar panels weren’t an option for me.
I also find the Arlo app to be buggy and unreliable. I ran into problems all the time with failed alerts, scheduling issues, phantom alerts, connectivity issues, and more. That’s just the tip of the iceberg. Even now, all my cameras appear offline every time I open the app. I need to wait 5 seconds for them to connect so I can start streaming video or adjust the settings.
For sporadic use inside my home, Arlo is a better option. I don’t keep my indoor cameras armed all the time. Instead, they activate when I’m away so I can check on things when I need to. As a result, I can go for 4 months or more without having to charge them. I also don’t have to deal with dragging a ladder all over my property.
Why is the Reolink camera system better than Arlo?
There are several important points to consider when comparing Reolink and Arlo.
First of all, the Reolink RLK8-800B4 security camera system is a PoE system. PoE stands for “power over ethernet,” meaning the cameras draw power directly from the NVR over Ethernet cables. Or, if you want, you can connect cameras to a DC power source and record directly onto a memory card instead of running Ethernet cables and using an NVR.
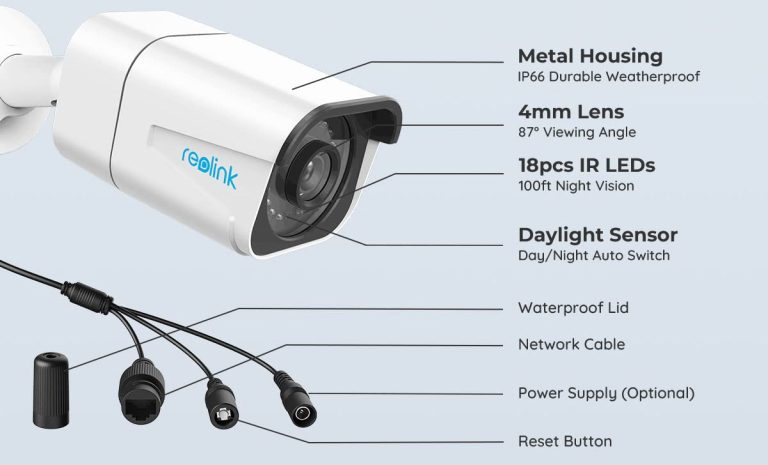
Here’s a look at the multi-connection cable on each Reolink camera:
No matter how you set them up, Reolink PoE cameras never need to be charged. Reolink does offer battery-powered Wi-Fi security cameras as well under the Argus brand. I didn’t test any of those models for this review, however.
Another reason I prefer Reolink cameras to Arlo cameras is the NVR. Unlike Arlo and other similar options, this Reolink camera system gives you 24/7 recording instead of only recording when motion events are detected.
The setup I tested comes with the latest Reolink RLN8-410 NVR. NVR stands for “network video recorder,” and it’s the small box you see with the cameras in pictures. This model is an 8-channel NVR, so it supports up to eight connected PoE cameras. Reolink also makes a 16-channel version called the RLN16-410 that supports up to 16 cameras.
Instead of recording to the cloud like Arlo, Reolink cameras record to a local hard drive inside the NVR. Some people might say this solution is more secure. It also means you don’t need to pay a monthly fee, which Arlo requires.
Arlo does offer local recording options if you plug a flash drive into your hub. However, the bulk of the service is still cloud-based. It also still won’t record 24/7, and you need to pay a monthly fee to use any of Arlo’s newer camera models. While Reolink does offer a cloud service with 30-day cloud video history, it’s less expensive and is not needed with PoE cameras.
Reolink Cloud plans & pricing
As I mentioned, there is an optional Reolink Cloud service if you want to subscribe to it. This service isn’t geared toward Reolink PoE camera systems like the RLK8-800B4 setup I reviewed.
Instead, Reolink Cloud is meant for Argus cameras and other Reolink cameras that work without an NVR. If you’re interested in those models, here are the main pricing tiers for Reolink Cloud:
Basic Plan: Free
- 7-day cloud video history
- 1 camera supported
- 1GB of cloud storage
Standard Plan: $3.49/month
- 30-day cloud video history
- 5 cameras supported
- 30GB of cloud storage
- Rich Notifications
Premier Plan: $6.99/month
- 30-day cloud video history
- 10 cameras supported
- 80GB of cloud storage
- Rich Notifications
Business Plan: $10.49/month
- 60-day cloud video history
- 20 cameras supported
- 150GB of cloud storage
- Rich Notifications
You can learn more about Reolink Cloud on the company’s website.
Arlo features that I miss
I definitely prefer Reolink cameras overall for outdoor use around my home. But there are a few Arlo features that I definitely miss.
First, I miss rich notifications with animated previews. This feature is available with Reolink Cloud, but not with a Reolink PoE camera system like the RLK8-800B4.
A rich notification shows you a quick animated clip of the motion that triggered an alert. Rich notifications didn’t always work as they were supposed to with my Arlo system, but it’s definitely a nice feature when it does work.
The other thing I miss is the ability to mute notifications for a certain period of time.
With Arlo cameras, you can quickly and easily mute notifications for a period of 30 minutes, 1 hour, 3 hours, or 24 hours. For example, you might want to mute notifications for an hour if you have landscapers at your house. Otherwise, you have to deal with incessant notifications as they work around your home.
This isn’t an option with a Reolink PoE camera system. Thankfully though, I did come up with a decent workaround.
If you have an iPhone, you can use Apple’s Shortcuts app to create a simple shortcut that opens directly to the Reolink notifications page in the Settings app. That way, you can quickly and easily toggle notifications on or off.
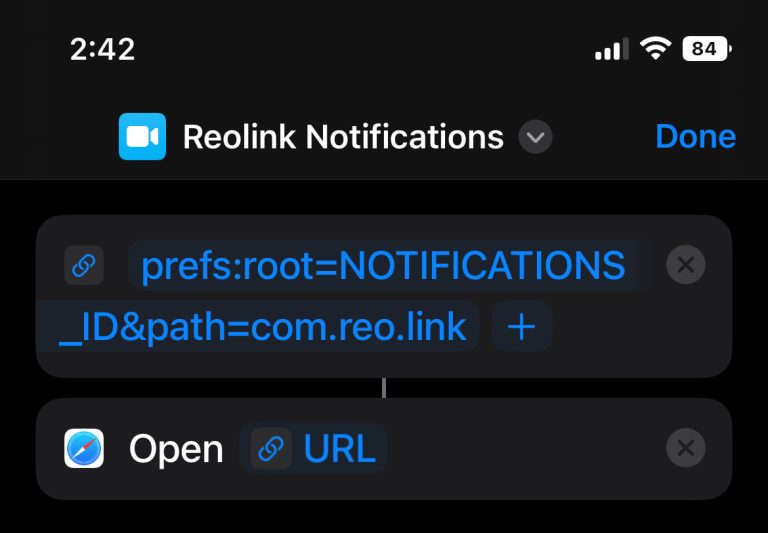
I followed this guide to create the shortcut. If you want to do the same thing so you can mute your Reolink notifications easily, I’ll save you some time by giving you the text string for the Reolink app:
prefs:root=NOTIFICATIONS_ID&path=com.reo.link
When you’re done, your shortcut should look exactly like the screenshot above. Then, you can simply tap a Shortcuts widget or use Siri to open the Settings app directly to the Reolink notifications page.
I’m sure something similar is possible on an Android device.
Reolink camera system highlights
Now that you know why a Reolink PoE camera system might be better than Arlo cameras, I’ll shift focus to some of my favorite features.
First and foremost, setting up a Reolink camera system is so easy. It’s plug-and-play in the truest sense of the term. As soon as you first connect a Reolink camera to your NVR, it immediately starts recording and is ready to use.
Of course, you’ll need to run all your Ethernet cables and mount your Reolink cameras before you get to that point. The same is true of any PoE camera system. If you’re a do-it-yourself type willing to spend time running cables between floors and through your interior or exterior walls, that’s great. I chose to use a company that installs security systems for this review.
Relolink B800 camera quality
On to the system itself, the included Reolink B800 cameras offer crystal-clear 4K video during most of the day. You can easily make out faces and small details in the video. I was even able to zoom in and clearly read the license plate number of a slow-moving car.
My only complaint regarding daytime video is that parts of your picture can get blown out a bit depending on where the sun is.
For example, two cameras in front of my house have some trouble at times in the late afternoon on sunny days. That’s when bright sunlight reflects off the pavement on the street in front of my house. The rest of the image is still clear though, and so are people as long as they’re not in the street.
Also of note, motion can be a bit of a problem at night. The overall picture is very clear with Reolink’s night vision. But there is definitely a bit of blur on people and objects moving quickly through the frame.
Reolink RLN8-410 NVR features & apps
Reolink’s software is fantastic. In fact, the computer and smartphone apps are so good that most users will never even have to connect a monitor or mouse to the NVR.
Everything you need to set up your Reolink camera system is available in the mobile apps or the desktop apps for Windows and Mac. You can tweak most settings as much as you want. You can also of course view live camera feeds and play recorded video footage.
Of note, Reolink is a trustworthy company that has been in the business since 2009. Reolink protects all data with 2048-bit RSA and 128-bit AES-GCM encryption. Video feeds are protected with SSL encryption.
You can easily toggle between high-quality 4K video and data-friendly low-quality video when viewing live feeds or recordings.
To access your recordings, simply tap the Playback button on any camera page in the app. You can scrub through each full day’s recordings or narrow things down so that only motion events are shown.
Below, you’ll find a screenshot that shows motion events spread across the day on one of my cameras. Clicking on any of those blue notches will start playing the associated recording. You can also further narrow things down to motion events triggered by people or vehicles.
This screenshot is from the Mac app, but Reolink’s other apps have a similar UI.

One thing you’ll want to do right away is adjust your motion zones and notification settings. If you don’t, you’ll get motion notifications every few seconds all day long due to things like wind blowing through leaves or bugs flying around at night.
Pro tip: in each camera’s settings section, go to Push Notifications > Schedule. In there, you can choose to receive notifications for “any motion,” “person,” and “vehicle”.
Disable “any motion”.
That way, you’ll only get notifications when the camera’s AI identifies a person or a vehicle. If you don’t, the constant notifications will likely drive you crazy. Remember, your Reolink NVR records 24/7 even when you don’t get motion notifications. You don’t need a notification every 10 seconds as leaves shake and cars drive past your home.
Reolink’s apps also let you make adjustments to motion detection sensitivity and even object size, in case you want a threshold so that small objects don’t trigger motion notifications.
There are other ways to tweak alert settings, too. For example, you can set a time delay of up to 8 seconds for person and vehicle motion alerts. That way, you’ll only get a notification if the motion lasts for the amount of time you set.
Upgrades I made to the Reolink RLK8-800B4 system
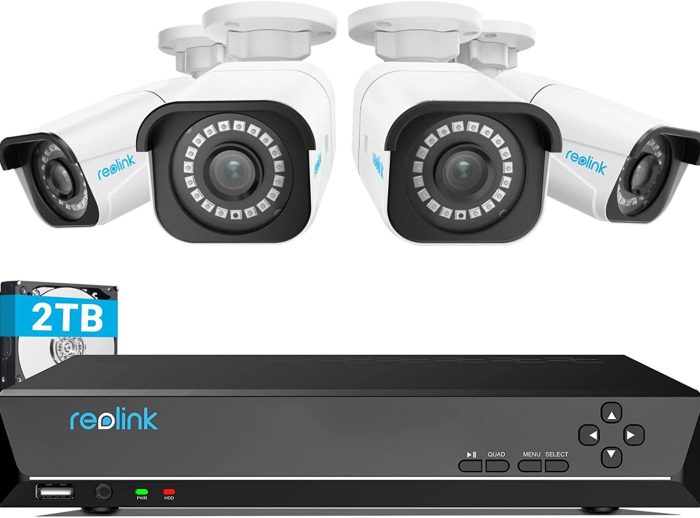
Out of the box, the Reolink RLK8-800B4 camera system includes a 2TB NVR and four 4K PoE cameras. For many people, that won’t be enough.
I wanted a few more things with my installation, and I’m going to discuss them in this section.
Upgraded cameras
First and foremost, the RLK8-800B4 comes with four Reolink B800 cameras. You can read about the B800’s specs and features below, but it lacks a couple of key features that I wanted in some locations outside my home.
So, I purchased a couple of Reolink RLC-811A PoE cameras in addition to the RLK8-800B4 bundle that Reolink sent us to review.
The RLC-811A looks just like the B800, but it has two key features that make it a significant upgrade. First of all, the RLC-811A has 5x optical zoom instead of the 4mm fixed lens on the B800. Also, it has five extremely bright LED spotlights that help enable full-color night vision.

Reolink RLC-823A and TrackMix cameras
Another big upgrade is the Reolink RLC-823A camera. I didn’t get one at first, but Reolink recently reached out and asked if I was interested in testing one.
In addition to 5x optical zoom and LED spotlights, the RLC-823A has mechanical pan and tilt features plus auto-tracking to follow any motion. So, for example, it can automatically pan and zoom as a person walks from one side of your yard to the other.
Here’s a quick motion-tracking video that my camera captured, so you can see how it works:
I found that setting up the camera was relatively easy, though there were one or two hiccups. I wasn’t able to use the procedure in the user manual, which involves scanning a QR code on a device to add it. As it turns out though, my NVR was already configured to automatically add new cameras, so I didn’t need to worry about it.
Video quality on the RLC-823A is just as good as it is on the RLC-811A model. But the auto-tracking feature definitely adds a lot to the equation. I love being able to extend the camera’s field of view almost infinitely. It does a good just of picking up motion and then following people, vehicles, or pets until they’re out of view.
Also neat is a feature that lets you pan the camera around and then save different positions. That way, you can easily switch to one of your favorite views with only a few taps.
In addition to the RLC-823A, Reolink also sent me a new Reolink TrackMix PoE camera to test.
This model is similar to the RLC-823A in that it’s a dome camera with a mechanical motor that lets it pan and tilt. It also features auto-tracking, just like the other model. It’s not quite as feature-rich, but it does have something that the RLC-823A does not: Dual lenses.
Instead of just one main camera, the TrackMix has a 2.8mm wide-angle lens as well as a second 8mm telephoto lens. That means this PoE camera can capture two feeds at once. One is the normal wide-angle feed with a panoramic view. Then, the second is a zoomed-in feed that can capture more detail.
In theory, the TrackMix sounds great. In my testing, however, this model hasn’t worked as advertised. Reolink has instructions that explain how to switch between the two video feeds or view them both simultaneously. Unfortunately, the part about how to switch feeds in the mobile app doesn’t work for me.
I can switch feeds easily in the macOS app, but I don’t have the same options on my iPhone. The only way I’ve found to see both video feeds on my iPhone is to enter “immersive view,” which shows all of your camera feeds on one screen. Immersive view is a bit of a pain to get to in the app though, so I doubt I’ll be using it very often.
This model comes in two different versions, a TrackMix PoE model and a TrackMix WiFi model that can connect to your network with either an Ethernet cable or Wi-Fi.
Reolink NVR upgrades
Next up is the NVR, which definitely needs some upgrades.
First of all, Reolink ships the RLN8-410 NVR with a 2TB hard drive. 2TB might be fine for a laptop, but it’s not much space for a 4K NVR. With five cameras feeding 4K video to the NVR all day long, 2TB was about enough space for five days’ worth of video. After that, the NVR starts overwriting the oldest recordings.
I wanted to be able to look back much further than that. Luckily, there are two ways to upgrade the RLN8-410 NVR’s storage.
First, you can upgrade the internal hard drive that comes in the NVR. Reolink says this NVR model supports up to 6TB, and it lists recommended hard drive models on its site. I chose the Seagate SkyHawk 6TB HDD, which has been working great.
Instructions for the upgrade are on Reolink’s website. It’s a very easy procedure that will take most people about 5 minutes to do. Then you just need to format the new hard drive, which is also quite simple.
Next, you can add an external HDD up to 6TB and connect it using the eSATA port on the back of the NVR. I did this too, using a second Seagate SkyHawk 6TB hard drive and a StarTech external drive enclosure that costs about $57 on Amazon.
Those two new hard drives give me a total of 12TB of storage instead of 2TB. That’s enough space for about a month of 4K recordings from five Reolink cameras.
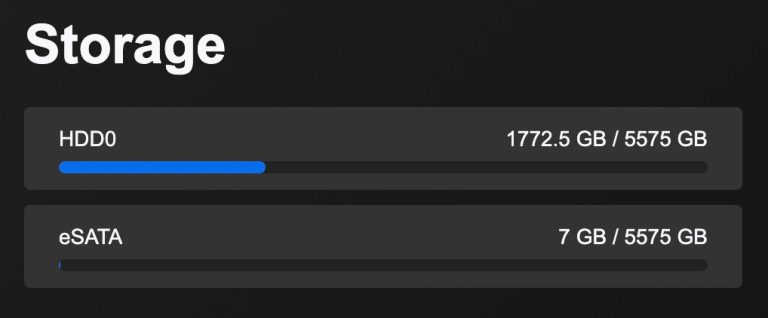
Of note, the 16-channel version of this Reolink NVR supports up to three hard drives. It has space for two HDDs inside the NVR, plus an eSATA port for an external hard drive.
Last but not least, I added a fan inside the Reolink NVR to help cool it down a bit. The RLN8-410 NVR has space, vents, and a connector port for a fan, but it doesn’t actually ship with one inside.
I bought a Noctua NF-A4x10 FLX fan on Amazon for $14 and followed the instructions in this video to do the installation. It works great and it’s very quiet. I can’t hear it at all, even when I’m just a few feet away from the cabinet that holds the NVR.
It’s a very simple procedure that anyone can follow. The installation took me about 8 minutes, though 5 minutes of that time was spent trying to work the included screws into the NVR case. They don’t fit perfectly, so you have to apply some force to screw them in.
Problems with Reolink cameras
I already mentioned a few shortcomings of this Reolink camera system. Examples include the lack of rich notifications and the inability to easily mute notifications for a short time. But there’s another issue that is far more important to me.
Reolink’s PoE home security camera systems really fall short when it comes to smart home integration.
The only smart home integrations currently supported by Reolink’s PoE system are Amazon Alexa and Google Home. That’s absolutely not good enough at all.
If you use a more comprehensive smart home system, Reolink simply won’t integrate with it at all. For example, I use SmartThings. My outdoor Arlo cameras used to be deeply integrated with my SmartThings setup, triggering all sorts of automations. Now, all that convenience is out the window.
Many systems that don’t support big smart home platforms like SmartThings offer a workaround by integrating with IFTTT. Bad news: Reolink doesn’t support IFTTT either.
It’s a bummer, but it’s certainly not the end of the world. You’ll find workarounds for most things if you’re willing to get creative. For example, I added a few Philips Hue Outdoor Motion Sensors around my home to handle most of the automations that used to be triggered by my outdoor Arlo cameras.
Reolink camera system price
Reolink offers so many different bundles, so prices vary. But the Reolink RLK8-800B4 PoE camera system is one of the company’s most popular options, and it’s the one I tested for this review.
The Reolink RLK8-800B4 system retails for $600, which is already a bargain compared to similar systems from some other brands. It goes on sale all the time though, so it’s unlikely that you’ll pay full price.
At the time of this writing, this Reolink PoE camera system was on sale for just $459.99 on Amazon and from other retailers.
By comparison, a 3-pack of Arlo Pro 4 cameras retails for $549.99. One additional camera costs $199.99.
That means you’ll need to spend $749.98 to get a 4-camera system like the Reolink RLK8-800B4. Plus, you can’t use your Arlo cameras without a $9.99/month subscription to Arlo Secure.
Reolink PoE camera system specs
The Reolink RLK8-800B4 camera system comes with two main components. First, there’s the Reolink RLN8-410 NVR. Then, you get four Reolink B800 cameras.
The NVR has 2TB of capacity, and the included cameras are all 4K cameras with 8MP sensors. Here are the full specs:
Reolink RLN8-410 NVR specs
Hardware
- Hardware V2
Video/Audio Input
- IP Video Input
- PoE IP camera x 8
Audio Input
- Cameras with built-in mic
Video/Audio Output
- Video Output
- VGA, HDMI
Display Resolution
- HDMI: 4096*3072, 3840*2160, 1920*1080, 1440*900, 1280*1024, 1280*720, 1024*768
- VGA: 1920*1080, 1440*900, 1280*1024, 1280*800, 1280*720, 1024*768
Audio output
- 1-channel, RCA
Included storage
- 2TB HDD
Expandable storage
- Up to 6TB internal HDD
- Up to 6TB additional storage via external HDD (eSATA connection)
Reolink B800 camera specs
Image Sensor
- 1/2.49″ CMOS Sensor
Video Resolution
- Default: 3840X2160 (8 megapixels) @20FPS
Lens
- f=4.0 mm fixed, F=2.0, with IR cut
Video Format
- H.265
Field of View
- Horizontal: 87°
- Vertical: 44°
Day & Night
- IR-cut filter with auto-switching
Night Vision
- 30 meters (100ft) (LED: 18pcs/14mil/850nm)
Frame Rate
- Mainstream: 2fps – 20fps (default: 20fps)
- Substream: 4fps – 15fps (default: 10fps)
Code Rate
- Mainstream: 4096Kbps – 8192Kbps (default: 6144Kbps)
- Substream: 64Kbps – 512Kbps (default: 256Kbps)
Audio
- Audio recording
Smart Alarms
- Person detection/vehicle detection/motion detection
Recording Modes
- Motion-triggered recording (default); scheduled recording, 24/7 recording
This review was originally published on September 24, 2022. It has since been updated with additional information.